When to buy your equipment
The ideal time to invest in paragliding equipment generally occurs after an introductory course. Indeed, it is at this time that you will be able to assess whether you really like this activity.
However, after an introductory course, you will not yet be able to fly alone. You can nevertheless continue to practice inflations to maintain the skills acquired and progress!
In France, renting paragliding equipment is rare. You will therefore have to invest in your own equipment or participate in courses where the school will provide you with the necessary equipment.
Paragliding
Which category of sail to take
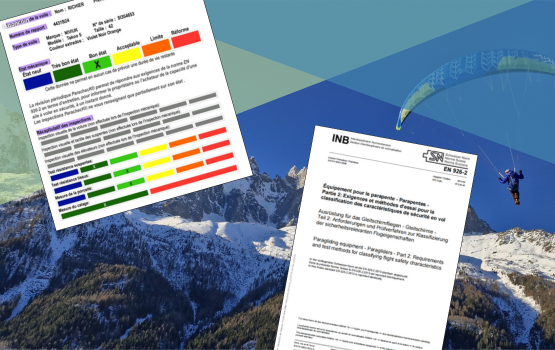
There are four categories of sails, standardized according to standard EN-926-2:
- Category A: Paraglider with maximum passive safety and strong resistance to exits from the flight envelope.
- Category B: Paraglider with good passive safety, and average resistance to exits from the flight envelope.
- Category C: Moderate passive safety, returning to flight following an incident may require active piloting.
- Category D: Demanding flight characteristics, requiring active piloting when leaving the flight envelope.
Beginners often wonder whether to choose an A- or B-category wing. We recommend choosing an A-category wing, which is the most suitable for a trainee aiming for autonomy and gaining experience.
Wings in this category are designed to be stable and forgiving of beginner mistakes, while offering a high level of passive safety. They allow you to progress quickly without feeling limited. On the contrary, an A-category wing will be a springboard for your progression. You can log many hours of flight on an EN-A wing without ever feeling frustrated.
Pro tip: At the beginning of my paragliding career, I flew hundreds of hours with my EN-A wing and never felt limited (Juliette LYC).
Very important: TFW!
In paragliding, the TFW (Total Flying Weight) refers to the total weight of the pilot and their equipment (harness, helmet, wing, reserve parachute, clothing, gloves, underwear, etc.) in flight. It must fall within the recommended weight range for the wing used, in order to stay within its performance parameters, especially the limits defined by its certification.
To be well positioned within the TFW range, you should aim for the upper third of the wing’s weight range—without exceeding it and be at least 5 kg below the maximum.
For example, if you weigh 70 kg and your equipment weighs 12 kg, your total TFW will be 82 kg. You should then choose a wing with a TFW between 70 and 90 kg, which would be ideal. A wing rated for 80–95 kg or 65–82 kg would not be comfortable for you.
Each brand has different TFW ranges, so you’ll need to identify which brand and model fits your TFW. You may even need to rule out certain brands if their weight ranges don’t suit you.
Light or classic construction?
When choosing your wing, you can opt for a “light” or a “classic” construction depending on your preferences and goals.
Light wings are ideal for hike & fly or travelling, thanks to their low weight, but they may be less durable in the long term due to the use of lighter fabrics.
Conversely, a wing with classic fabric will be more durable and more tolerant of the small mishaps that beginners inevitably encounter (bushes or brambles during inflation practice, ground handling on rougher terrain, etc.), though it will be slightly heavier. If you don’t plan to use your paraglider for long outings or hikes, a classic construction may be more appropriate.
As you can see, if you plan to fly mainly from sites accessible by car, choose a classic wing. But if your favourite site requires a hike to reach, then a light wing will be more suitable.
For reference, the weight difference between a light wing and a classic wing is around 1 kg.
Pro tip: For very small pilots who cannot generate much energy during inflation, we recommend using a light wing to make this phase easier.
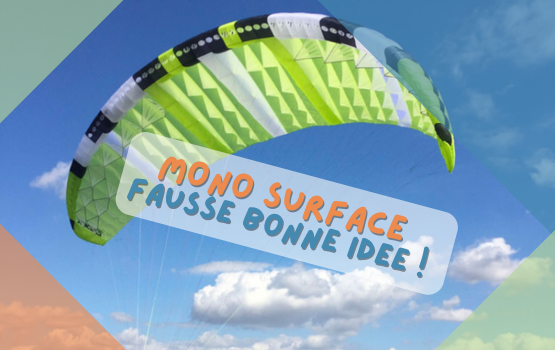
Single skin wings for beginners?
Although single skin wings (with a single layer of fabric) are lightweight and easy to handle, they are not recommended for beginners.
These wings are overly damped and do not allow for effective learning of piloting skills. By choosing a single skin wing, you may not fully develop your flying and control abilities.
Personally, I do not recommend starting your progression with a single skin wing, as they are not true paragliders.
They are heavily damped on the pitch axis, which means they do not train you to become a real pilot. You will have very little to do under these wings, and your piloting technique will develop only minimally… Little need for pitch control, little recentring during take-off.
If you want lightweight equipment, opt instead for an A-category wing combined with a light reversible harness, an airbag, and a lightweight reserve.
Once you have acquired your foundations on a “real” wing, you can treat yourself to a single skin or an ultralight wing for your adventures, as these wings are extraordinary and allow you to combine activities such as hiking, mountaineering, and more.
New or second-hand?
New: Investing in new equipment has several advantages. Having brand-new gear is a real asset for your progression: better overall condition, easier inflation, better handling, guaranteed enjoyment, and therefore steady progress.
Second-hand: Choosing second-hand equipment is also a good option if you are on a tighter budget. However, it must be done under certain conditions.
We recommend choosing a fairly recent wing so that it benefits from the latest design improvements and remains easy to resell when you want to change category. We strongly advise you to follow this checklist:
- Have the wing inspected by an official service center, with a report less than 6 months old. This guarantees that the wing is in the condition stated by the seller and gives you an idea of its wear. Even when stored without flying, a wing’s lines can deteriorate or shrink, affecting the trim.
- See the wing in person. If possible, inflate it to check whether it rises properly and whether the structure is sound (no tears, no missing lines, etc.).
- Inspect the wing: check for holes, line colour (touch them to detect any bumps or damage), and the texture of the fabric. Personally, I even touch the fabric or the lines with my tongue to detect whether there has been exposure to salt water, especially after a sea landing.
Our top picks
Here are some wing models that are especially recommended for beginners, based on their performance, ease of use, and build quality:
Standard construction:
- Alpha series from ADVANCE (mainly the 6, 7, and 8)
- Koyot from NIVIUK (mainly the 4 and 5)
- Mescal from Skywalk (mainly the 5 and 6)
Light construction:
- Alpha DLS from ADVANCE
- Koyot P from NIVIUK (mainly the 4 and 5)
- Massala from Skywalk (mainly the 3 and 4)
The harness
Choosing the right harness is just as crucial as choosing the wing, as it will influence your comfort, safety, and progression in paragliding. The harness is the component that connects you to the wing, and it is essential to select one that best suits your needs and your level of experience.
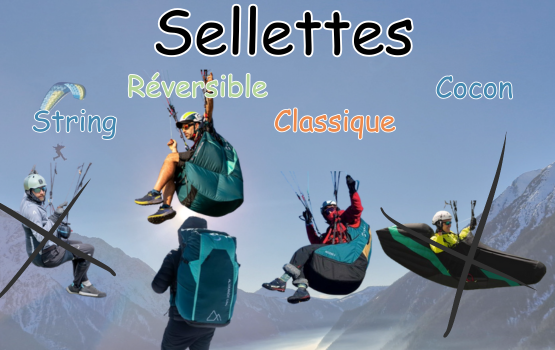
Types of harnesses
For beginners, it is recommended to choose a simple seating system, such as leg straps or a seatboard harness. These types of harnesses are comfortable, easy to adjust, and well-suited to beginner practice.
Do not use cocoon-type harnesses, which add unnecessary complexity for a beginner. A cocoon makes it harder to correct piloting mistakes. It is therefore better to reserve them for more advanced pilots who have gained enough experience and mastery of paragliding.
Back protection or under-seat protection?
Safety is essential, especially for beginners. It is crucial to choose a harness equipped with protection. As a novice, you will inevitably make mistakes and that is completely normal. A fall is always possible, whether during take-off or landing.
For this reason, a harness with protection—such as an airbag or a mousse bag is indispensable. These protection systems help reduce the risk of injury.
Although it may seem like an excessive precaution, even experienced pilots can face situations where protection plays a decisive role in preventing serious injuries, so there is no reason to go without it!
Reversible or not, depending on use
If you plan to hike with your gear, a reversible harness with an airbag is a very smart choice in terms of weight and volume. However, it is less durable and less protective than a harness with a mousse bag, which is heavier but also more protective and more durable over time.
Types of reserve containers
The reserve parachute is a key safety component in paragliding. The container in which it is stored must be chosen carefully. There are several types of reserve pockets: under-seat, back-mounted, and front-mounted.
- Under-seat and back-mounted: These types of containers are most recommended for beginners, as they are integrated directly into the harness and have been designed not to hinder the pilot during inflation or take-off.
- Front-mounted: This type of container is independent from the harness and is attached in a pod connected to the main carabiners. The advantage is the excellent visibility and accessibility of the reserve handle, but this setup can be cumbersome during inflation and take-off.
Our top picks
To help you choose, here are some harness models that are particularly well suited for beginners:
Classic harnesses
- Access by Sup’Air
- Axess by ADVANCE
Reversible harnesses
- Progress by ADVANCE
- Altirando (recent version) by Sup’Air
- Wani Light by Woody Valley
The reserve parachute
A reserve or not?
Although many beginners sometimes hesitate to invest in a reserve parachute because of its cost, it is essential to always fly with one.
A reserve parachute greatly increases your chances of survival in an emergency situation. Even if the probability of needing a reserve is low, it is better to be prepared and take every possible precaution.
As a beginner, having a calm and relaxed mindset is a key factor for progressing safely and confidently.
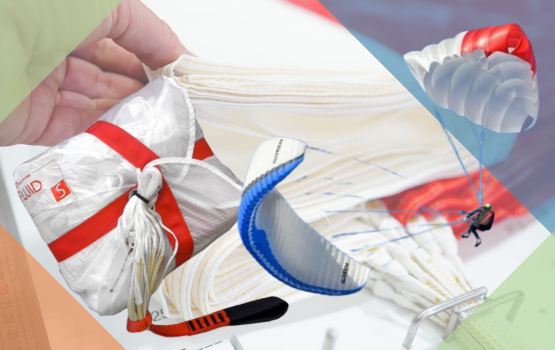
Types of reserve parachutes
There are several types of reserve parachutes, each with specific characteristics that can affect your safety in flight:
- Round parachute: This is the oldest and most affordable type of reserve. Although reliable, it has a sink rate of around 5.5 m/s when fully deployed. While more economical, it offers a higher sink rate than more modern designs.
- Square parachute: More recent and higher-performing, it offers a sink rate below 5 m/s and reduces pendular motion. It is more expensive, but it provides better safety and overall performance.
- Hybrid parachutes: These models combine elements of round and square reserves. They are also suitable options, but it is important to verify their sink rate before choosing.
- Steerable parachute: Although effective for experienced pilots, a steerable reserve is not recommended for beginners because it requires active control under canopy. In an emergency, a reserve with no horizontal speed is more suitable, as it allows you to focus on the landing.
Where to place yourself in the reserve’s TFW range?
The pilot must remain below the maximum certified TFW of the reserve parachute.
For example, if your TFW is 75 kg, it is recommended to choose a reserve with a maximum TFW of 90 or 100 kg. A parachute with a max TFW of 75 or 80 kg will result in a faster sink rate due to the higher wing loading.
However, you should not choose a reserve that is too large, as this can reduce pendular stability. For example, for a pilot with a TFW of 85 kg, a reserve with a max TFW of 120 kg is not ideal. A model rated for 100 or 110 kg max would be more appropriate.
Pro tip: Always check the expiration date of your reserve parachute. Whether new or second-hand, most manufacturers specify a lifespan of 10 years from the date of purchase, regardless of the model (round, square, hybrid, steerable, etc.). This is for good reason: although your reserve may still function after that period, its performance—especially sink rate and stabilization time—may no longer be optimal.
The Radio
A radio is an essential tool, not only for your safety but also for your progression and communication with other pilots. It allows you to communicate in case of emergency, receive crucial information during a flight, or call for help if needed.
A radio also lets you follow real-time weather conditions, communicate with your instructor during a training course, and chat with friends or other pilots in the air. It’s a piece of equipment that will accompany you throughout your flying journey, whether you’re a beginner or an experienced pilot.
Two Frequencies to Remember:
- 154.150 MHz: The frequency dedicated to communication between pilots in flight, ideal for chatting or exchanging information with other paragliders.
- 143.9875 MHz: The radio frequency used to listen to the FFVL weather beacon network. It is also useful during rescue operations, such as interventions by firefighters or mountain rescue teams (PGHM). However, it’s important not to chat on this national frequency.
Choosing a Radio
When it comes to choosing a model, there are several options. Chinese models such as Baofeng are often cheaper, but their reliability can be inconsistent, with frequent interference. More reputable brands like CRT offer a good balance between performance and price. For optimal quality, Icom or Kenwood are the top references, although they are more expensive.